DNS Propagation explained
DNS propagation is the time it takes for DNS changes, like a new IP address or updated nameservers, to spread across the internet.
DNS propagation is the time it takes for changes to your DNS records to spread across DNS servers worldwide. When you update a nameserver, change an A record, or point your domain to a new host, that change doesn’t take effect everywhere instantly. It spreads gradually as DNS servers around the world check for updates and refresh their cached records.
The frustrating reality: during propagation, different people in different locations may see different versions of your site. Someone in Oslo might reach your new server while someone in New York is still hitting the old one. Both are querying the same domain. They’re getting different answers because different DNS servers have cached different information.
Why DNS Propagation Happens
To understand propagation, you need to understand how DNS caching works.
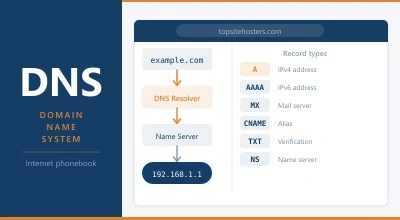
When your browser needs to resolve a domain name to an IP address, it doesn’t go directly to the authoritative nameserver. It queries a recursive DNS resolver, typically operated by your ISP or a public DNS provider like Google (8.8.8.8) or Cloudflare (1.1.1.1). The recursive resolver does the legwork: it queries the root servers, then the TLD nameservers, then your domain’s authoritative nameservers, and returns the answer to your browser.
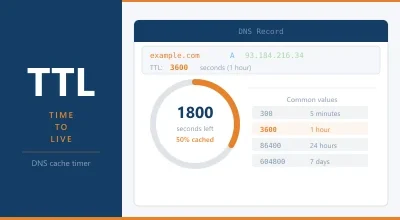
Here’s the key: the recursive resolver caches that answer. For a set period of time defined by the TTL (Time to Live) value in your DNS record, the resolver stores the result and uses it for subsequent queries. It doesn’t check the authoritative nameserver again until the TTL expires.
When you change a DNS record, the authoritative nameserver is updated immediately. But all the recursive resolvers that have cached your old record keep serving the cached version until their TTL expires. Once it expires, they query again and get the new answer. Propagation is complete when all cached copies of the old record have expired and been replaced with the new one.
There’s no central command that flushes all DNS caches at once. Each resolver operates independently. The process is gradual, which is why propagation takes time rather than being instantaneous.
How Long DNS Propagation Takes
The honest answer: anywhere from a few minutes to 48 hours, with most changes visible within a few hours.
The primary factor is your TTL setting. If your DNS record has a TTL of 86400 seconds (24 hours), DNS resolvers can cache the old record for up to 24 hours before checking for updates. A TTL of 300 seconds (5 minutes) means the cached record expires much sooner, and resolvers get the new answer much faster.
Secondary factors include:
Your ISP’s resolver behaviour: Some ISPs run their own DNS resolvers that don’t always honour TTL values precisely. They may cache records for longer than the TTL specifies, or they may have their own minimum cache times.
Geographic distribution: DNS servers in different regions update at different times. A server in Europe might get the new record quickly if your nameservers are European. A server in Asia Pacific might take longer.
Record type: Some record types propagate faster than others. A records and CNAME records typically propagate within the TTL window. Nameserver changes (NS records) take longer because they involve the TLD registry updating its records, which has its own propagation delay on top of the DNS TTL.
Nameserver changes vs record changes: Changing a nameserver is a more fundamental change than updating a single DNS record. When you point your domain to new nameservers (as happens when you switch hosting providers), the change has to propagate through the TLD registry as well as through DNS resolvers. This typically takes longer than updating an A record while keeping the same nameservers.
How to Speed Up DNS Propagation
You can’t force every DNS resolver in the world to flush its cache, but you can take steps to minimise propagation time before making a change.
Lower your TTL in advance. This is the most effective strategy. Before making a DNS change, reduce your TTL to a low value; 300 seconds (5 minutes) is common. Wait for the current TTL to expire (so all resolvers have refreshed with the new short TTL), then make your DNS change. With a 5-minute TTL, propagation completes in minutes rather than hours.
The process:
- Log into your DNS management panel
- Change the TTL on the relevant records to 300 seconds
- Wait for the current TTL duration (so the short TTL propagates)
- Make your DNS change
- Wait for full propagation (should be fast with the short TTL)
- Raise the TTL back to a normal value (3600 or 86400)
Use a fast public DNS resolver when testing. When checking whether your DNS change has taken effect, use Google’s DNS (8.8.8.8) or Cloudflare’s DNS (1.1.1.1) rather than your default ISP resolver. Public resolvers tend to propagate faster and give you a better picture of what most of the world will see.
Flush your local DNS cache. Your computer also caches DNS records. Even if DNS has propagated globally, your local machine might be serving you the old answer from its own cache. Flushing your local DNS cache forces a fresh lookup.
On Windows:
ipconfig /flushdns
On Mac:
sudo dscacheutil -flushcache; sudo killall -HUP mDNSResponder
On Linux:
sudo systemd-resolve --flush-caches
How to Check DNS Propagation
Several tools let you check the current DNS resolution for your domain from servers in different locations worldwide.
whatsmydns.net is the most widely used. Enter your domain and record type, and it queries DNS servers across dozens of locations simultaneously, showing you which have the new record and which are still serving the old one. It’s the quickest way to get a global picture of propagation status.
dnschecker.org offers similar functionality with a different set of global DNS servers. Using both together gives you more confidence in the results.
dig is a command-line tool available on Mac and Linux. It queries DNS directly and shows you the authoritative answer:
dig topsitehosters.com A
You can also query a specific DNS server to see what it’s returning:
dig @8.8.8.8 topsitehosters.com A
Our DNS Lookup tool lets you query multiple record types at once and see the current values without needing a command-line tool.
DNS Propagation When Switching Hosts
Switching web hosting providers always involves a DNS change. Understanding the process makes it less stressful.
When you switch hosts, the typical process is:
- Set up your website on the new host
- Test it using a hosts file edit or staging URL before changing DNS
- Lower your TTL on the old host’s nameservers (if you have access)
- Update your nameservers at your domain registrar to point to the new host
- Wait for propagation
- Verify your site is loading from the new server
The period between updating your nameservers and full propagation is the trickiest part. During this window, some visitors reach the new server and some reach the old one. For a simple informational site, this is mainly a nuisance. For a site that accepts orders or user registrations, you need to plan more carefully.
Strategies for minimising disruption during a host switch:
Keep both servers running during propagation. Don’t cancel your old hosting immediately after updating nameservers. Keep it active for 48 to 72 hours to ensure visitors still reaching the old server get a working experience.
Use the same database on both servers during transition. If your site has a database (WordPress, WooCommerce), changes made during propagation on the old server won’t appear on the new one. For high-activity sites, minimising the time between DNS update and full propagation is important.
Schedule the switch during low-traffic periods. If your site has predictable traffic patterns, make the DNS change at a time when traffic is lowest to minimise the number of users affected during the propagation window.
Nameserver Propagation vs Record Propagation
These are two different types of DNS changes with different propagation timelines.
DNS record changes (updating an A record, CNAME, MX record, or TXT record) while keeping the same nameservers are generally faster. The change is made at your current nameservers, and recursive resolvers pick it up as their cached copies expire. With a short TTL, this can happen in minutes.
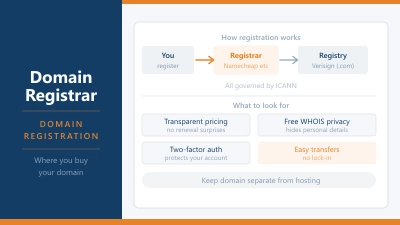
Nameserver changes (pointing your domain to completely different nameservers) are slower. This involves the TLD registry updating its records. When you change your nameservers at your domain registrar, the registrar submits the update to the TLD registry (Verisign for .com, for example). The registry updates its records, and that update propagates through the root DNS system. This layer of propagation operates independently of your TTL settings and typically takes longer.
In practice, nameserver changes usually propagate within a few hours for most users, but can take up to 48 hours in worst-case scenarios with slow-updating resolvers.
TTL Values and Best Practices
TTL (Time to Live) is measured in seconds. Common values and their appropriate uses:
| TTL | Duration | Use case |
|---|---|---|
| 60 | 1 minute | Immediately before a planned DNS change |
| 300 | 5 minutes | Short-term before migrations or changes |
| 900 | 15 minutes | Moderately dynamic setups |
| 3600 | 1 hour | Standard for most records |
| 86400 | 24 hours | Stable records that rarely change |
For most DNS records on a stable site, 3600 seconds (1 hour) is a sensible default. It balances propagation speed when you do need to make a change against the number of DNS lookups your nameservers have to handle.
Very short TTLs (under 60 seconds) are generally not recommended for ongoing use. They increase the query load on your nameservers and may not be honoured by all resolvers. Some DNS providers charge based on query volume, making very short TTLs unnecessarily expensive.
Frequently Asked Questions
Why is my site showing differently for different people? This is DNS propagation in action. Different DNS resolvers in different locations have cached different versions of your DNS records. As caches expire, the new record spreads. This is normal and temporary.
Can I force DNS propagation to complete faster? Not globally. You can flush your own DNS cache and use a low TTL before making changes to speed things up, but you can’t force third-party DNS resolvers to update. The propagation timeline is determined by TTL values and resolver behaviour outside your control.
My TTL is set to 3600 but changes are taking more than an hour. Why? Some ISP resolvers don’t honour TTL values strictly. They may have minimum cache times or apply their own caching policies. Additionally, if your TTL was recently lowered from a higher value, some resolvers may have cached the record when the TTL was higher and won’t check again until that original TTL expires.
Does Cloudflare speed up DNS propagation? Cloudflare’s DNS service (1.1.1.1) is one of the fastest-updating public resolvers. If you’re using Cloudflare for DNS management (not just as a resolver), changes made in the Cloudflare dashboard typically propagate to Cloudflare’s global network very quickly. Changes still need to propagate through other resolvers, but Cloudflare’s infrastructure speeds up the process.
What is negative caching? When a DNS resolver queries for a domain and gets a NXDOMAIN response (domain doesn’t exist), it caches that negative result for a period defined by the SOA (Start of Authority) record’s minimum TTL. This means if you’ve recently registered a domain and it’s not yet resolving, the “doesn’t exist” answer may be cached for a while even after the domain is properly configured.
Should I use my host’s nameservers or Cloudflare’s? Using Cloudflare’s nameservers gives you access to Cloudflare’s CDN, DDoS protection, and fast DNS infrastructure even if you’re hosting elsewhere. Many site owners use Cloudflare for DNS management regardless of their host. The trade-off is adding a dependency on Cloudflare’s platform. For most sites, the benefits outweigh this concern.